
I used to do a sloppy side braid for work, then by lunch it had puffed out and looked like two different hairstyles fighting each other. If your braids start neat and end frizzy, this list is for you. These are the latest hair braids that actually hold, look intentional, and don’t destroy your edges when you sleep on them.
These ideas work best for shoulder length to mid-back hair, 2A through 4A textures with notes for coarser hair. Most styles take 5 to 25 minutes once you get the rhythm. Budget ranges from free technique swaps to a small tool spend under $30. You can do almost all at home, except dense protective braids that are worth a pro if you want them to last months.
Classic Box Braids With Comfortable Parting
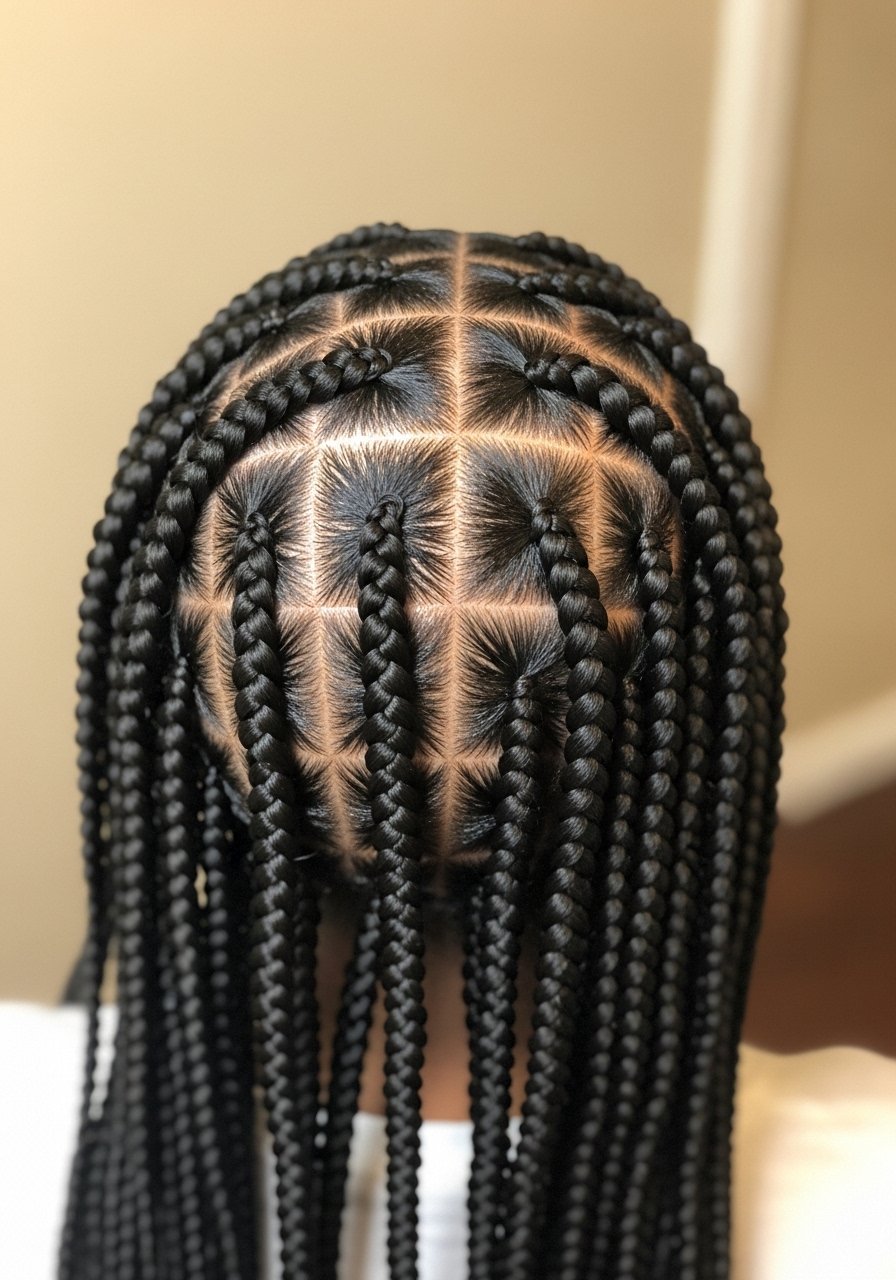
Box braids last when the parting and tension are right. I learned the hard way by pulling them too tight and getting sore edges. For medium-density hair plan on 20 to 40 braids for mid-back length, smaller if you want them to last longer. I prep with a light oil on the scalp and a slip-free edge control like Eco Styling Gel to smooth the part lines. Expect a two to four hour install for DIY, or book a braider for accuracy. If you plan to sleep in them, wrap with a silk scarf to cut frizz and reduce breakage around the hairline.
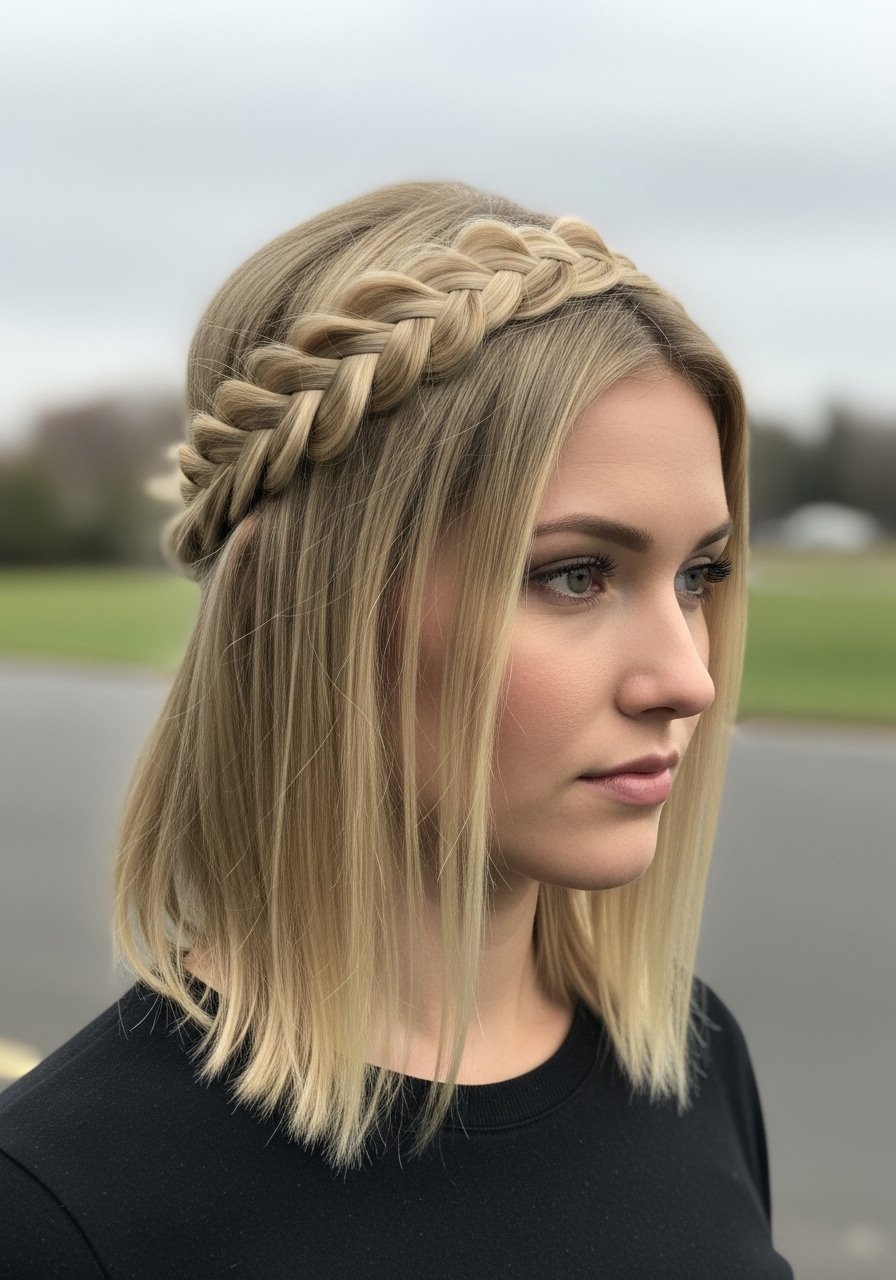
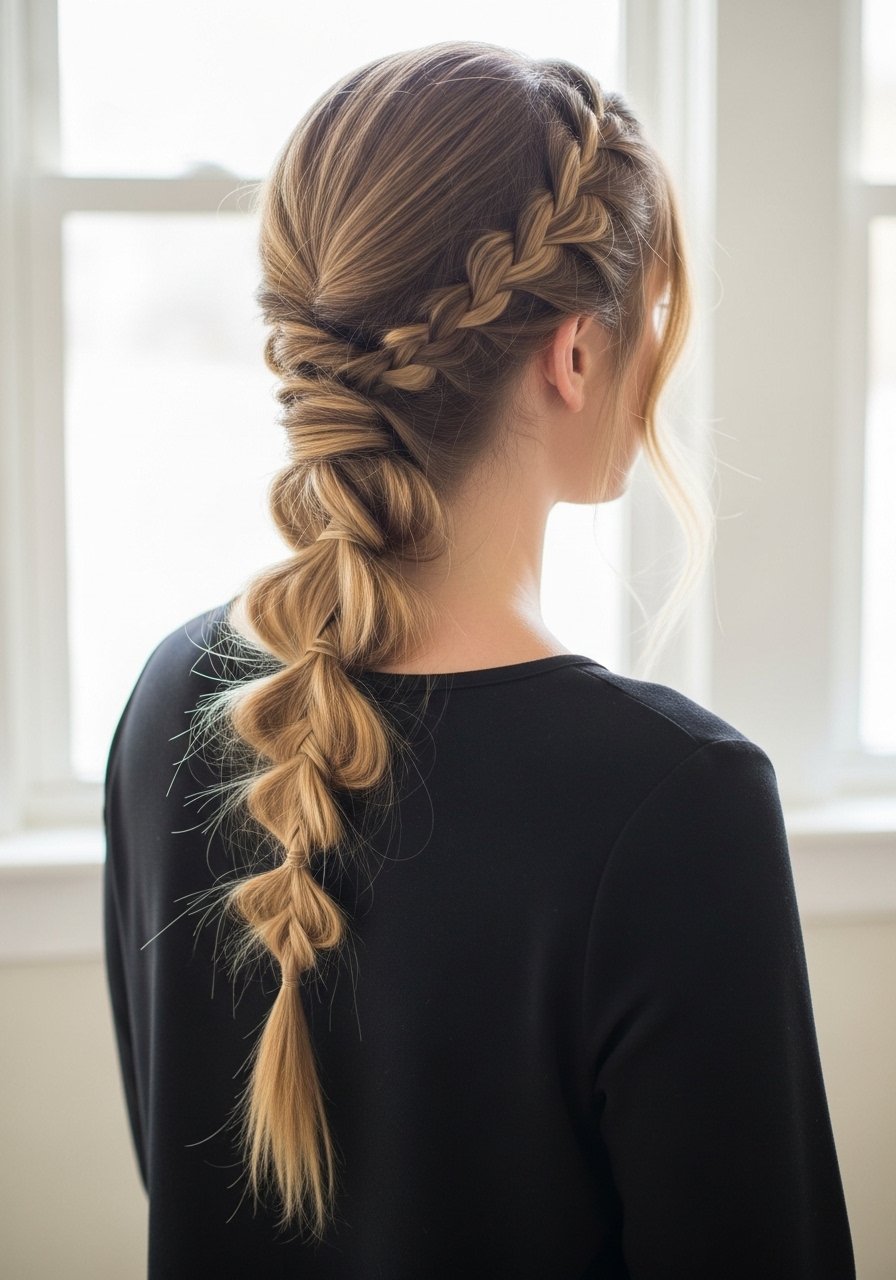
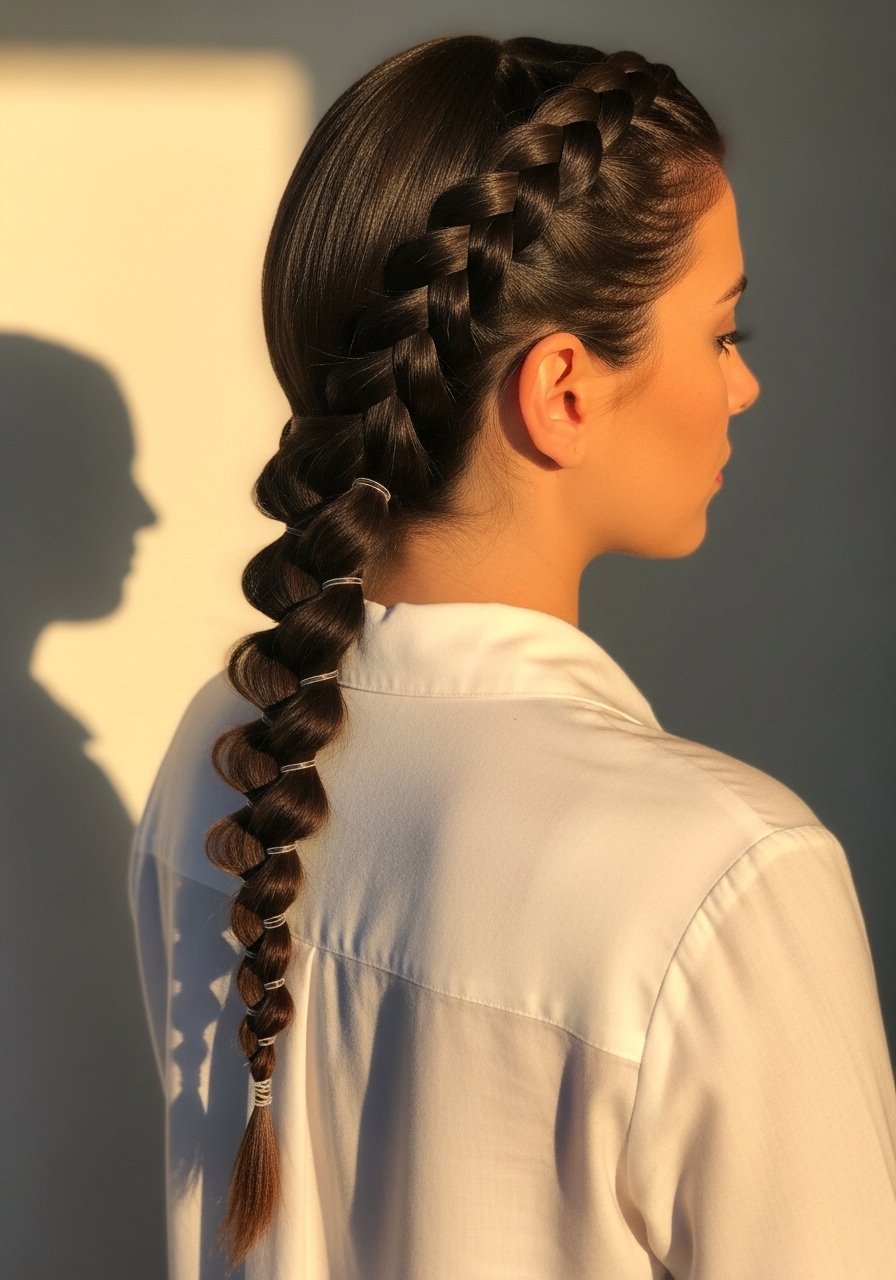
Dutch Braid Into Low Textured Bun
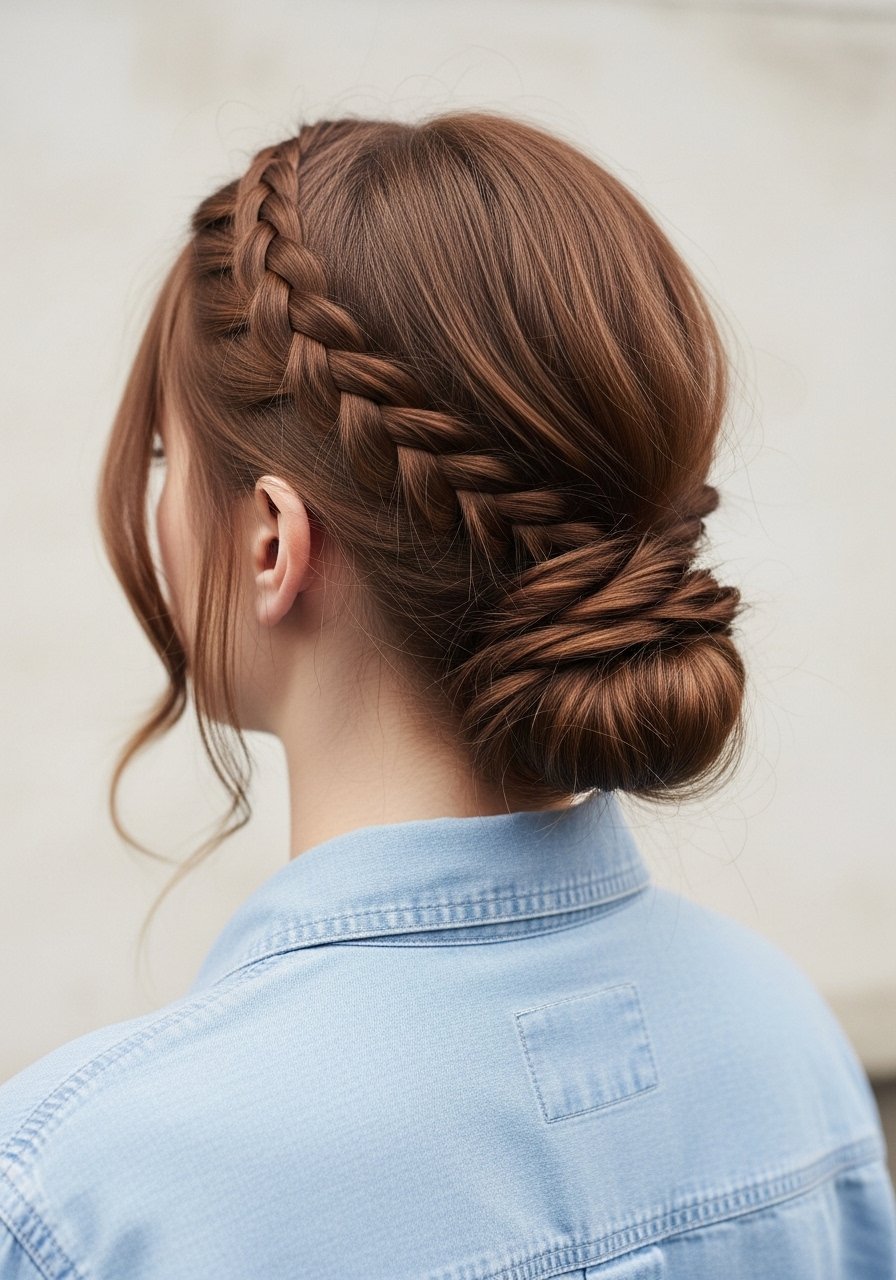
A Dutch braid sits higher than a French braid, which gives more volume at the crown when you pull the sections slightly. For fine to medium straight hair, pick four sections and braid with a firm grip for the first two inches, then loosen every three stitches to create that “done but soft” look. Two spritzes of a lightweight texturizing spray, like Bumble and bumble Surf Spray, on damp hair before braiding gives grip without crunchy residue. Heat styling the ends at 300F first will help the bun keep shape, but always use a heat protectant and keep iron passes under 10 seconds.
Fishtail Braid With Barber-Style Finish
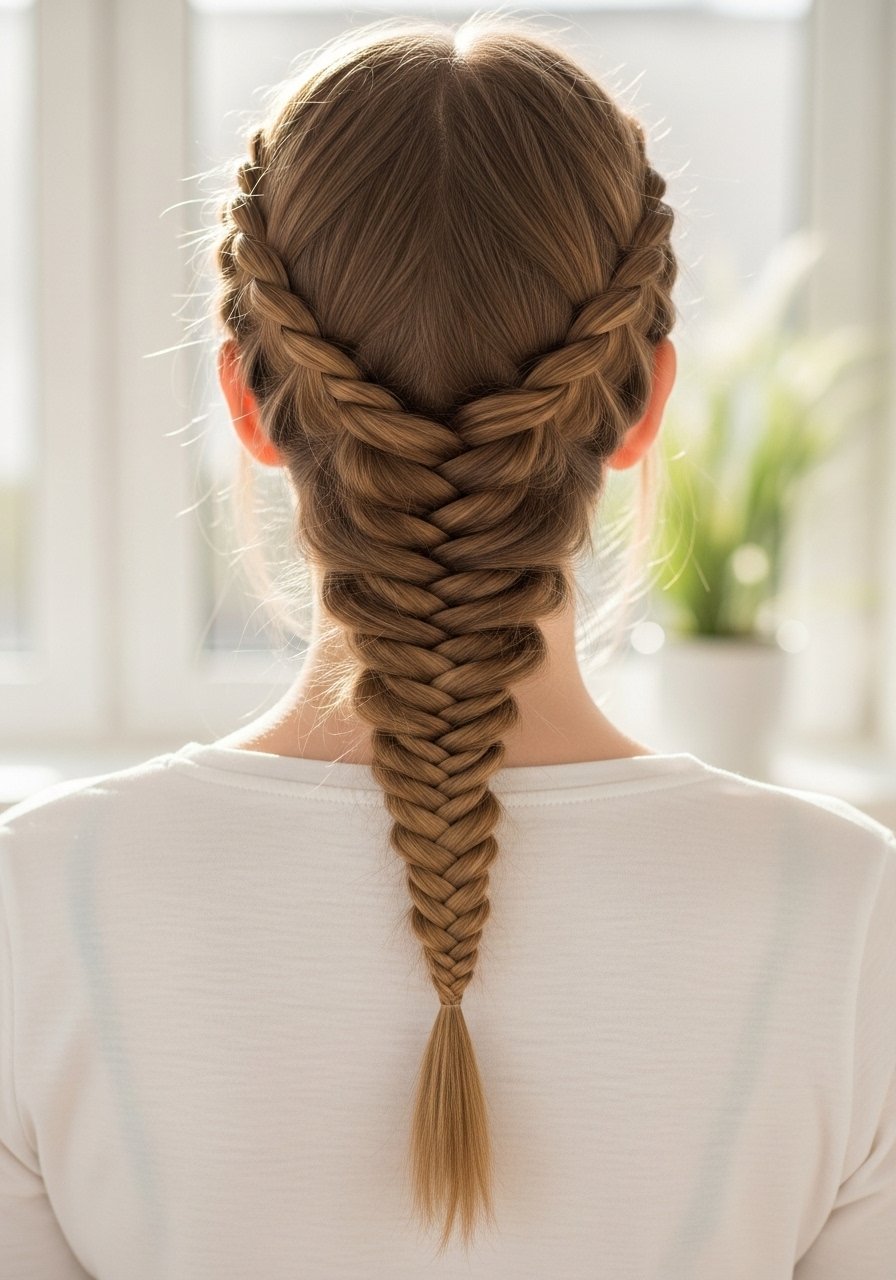
Fishtail braids look complex but are just smaller sections repeated. For medium-thick hair, split the hair into two main halves and use 1/4-inch sections for the pattern. The tiny sections are what make it look polished. If your fishtail falls out by commute time, you are probably using too-smooth a conditioner beforehand. Try a light leave-in with grip, like a pea-size on damp lengths, and finish with a couple of drops of Argan oil on ends only. For a barbered finish at the nape, tuck the end into a clean elastic and pin under the braid.
Pull-Through Braid For Big Volume

The pull-through braid gives braid scale without adding weight. You will clip small ponytails with clear elastics and pull sections through to create each loop. For long, layered hair, plan on 6 to 8 sections for visible volume. Use a medium-hold mousse before styling to add structure, and pinch each loop open two or three times as you go to make them look full. I like a couple of drops of silicone-free serum on the ends to keep them from fraying. This is very DIY friendly and takes about 15 minutes once you practice.
Milkmaid Braids With Soft Face-Framing Pieces

Milkmaid braids bring a braid over the head for an instant romantic look, and they are forgiving for curly textures. Leave out 1 to 2-inch face-framing pieces to soften the style. If your curls frizz under the braid, try the layering method: a light leave-in cream first, then a gel for hold on the braid itself. My switch from gel-only to cream under gel solved my midday collapse. Use comfy elastics and pin the braid with U-pins rather than tight ties so your crown does not get a headache.
French Braid With Layered Face-Framing For Round Faces

If you have a round face, a French braid that pulls around the front and tucks behind the ear creates length visually. Sweep the braid slightly to the side instead of dead center and leave 1 to 2 inches of layered pieces to break the roundness. For short to medium lengths, use small sections near the hairline and increase section width as you move back. Finish with a light hairspray, but avoid over-spraying the roots which can stiffen short layers. This style is quick and blends well with trims between six and ten weeks.
Boxer Braids With Slicked Back Styling Gel
Boxer braids stay in place because of tension and clean parting. They work on thick and coarse textures especially well when you pre-smoothe with a gel that has medium hold. Apply a dime-sized amount of gel along the part and use a boar bristle brush to smooth into the braid start. For edges, a light stroke with a toothbrush and edge control keeps them neat without product overload. If you worry about breakage, avoid pulling the first inch too tight and stretch the braids slightly after the first day to relieve stress.
What I Keep In My Braid Kit
- A silk scarf and a silk pillowcase queen size to protect braided hair overnight
- Olaplex No. 3 Hair Perfector 3.3oz for weekly bonding treatments, buy from the official seller to avoid counterfeits or grab it at Sephora
- Goody Ouchless Elastics multipack for secure ties without dents
- Denman Classic Styling Brush for smoothing and distributing product before braiding
- Eco Styler Olive Oil Gel 16oz for hold without crunchy build-up
- Bobby Pin Variety Pack a small investment that saves ruined braids
- Wide Tooth Comb for detangling before sectioning
- Texturizing Spray 6oz for slippery hair so braids hold
- Edge Brush for delicate hairline styling
- Silicone-Free Serum 3.4oz to finish and tame flyaways
Halo Braid Worn Low For Thin Hair
Halo braids can fake fullness on thinner hair. Start with a three-strand braid at one ear and work clockwise, adding small amounts of hair so the braid sits like a ring. For fine hair, add a bit of dry shampoo to the roots before braiding to give grip. If your braid sinks or slips, use three to four small U-pins along the underside to anchor it. This is a low-risk DIY style you can do in 12 to 15 minutes and it looks polished on second-day hair.
Rope Twist With Sleek Finish For Shorter Lengths
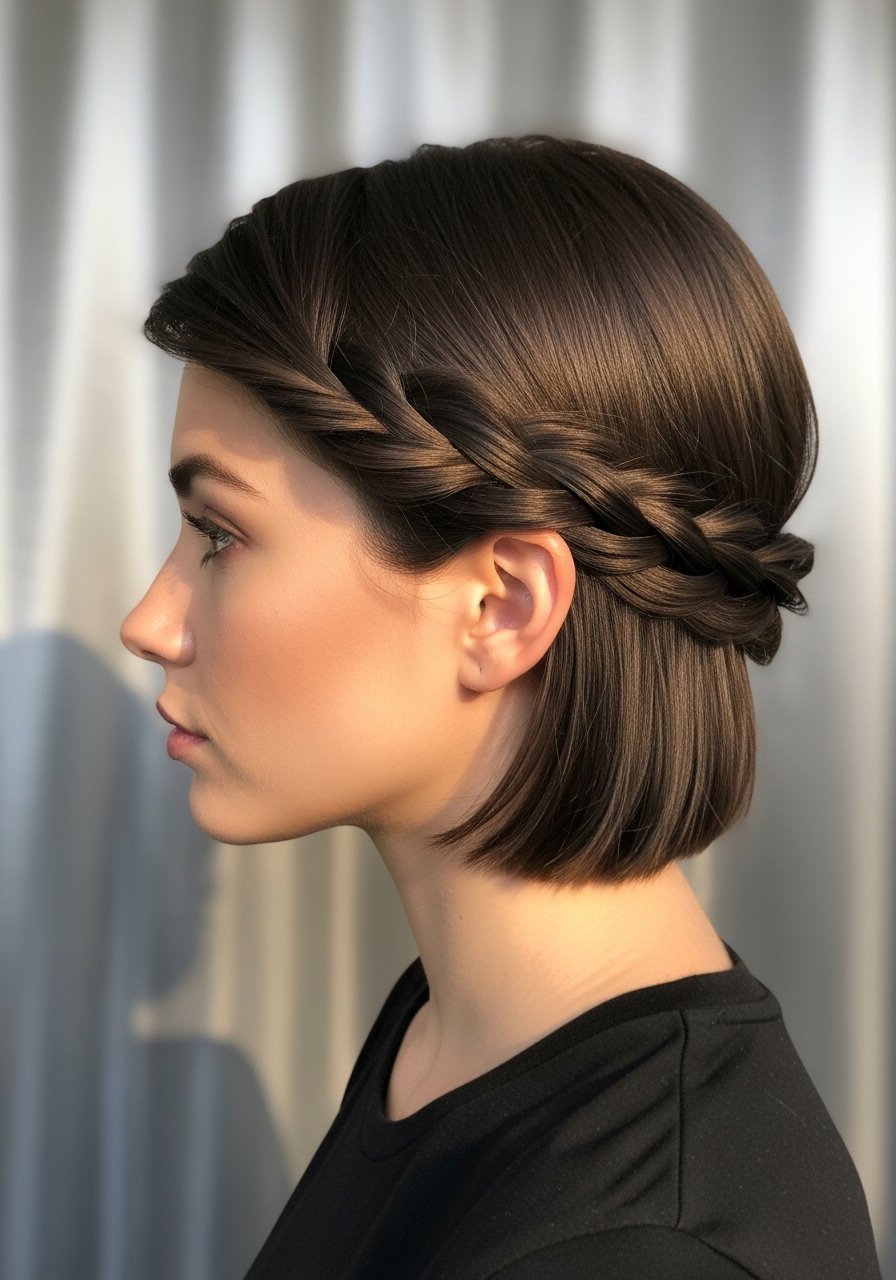
Rope twists are a simple two-strand twist that read like a braid but are faster. They work beautifully on shorter lengths where full braids would not hold. Make sure you twist each section clockwise, then wrap them counterclockwise to lock in the pattern. For slippery, freshly conditioned hair, a light spritz of texturizer and a 7 to 9 second blast with a flat iron set at 300F will give enough texture to hold. Avoid twisting the very root too tight to prevent scalp aches.
Waterfall Braid For Soft Cascading Strands
The waterfall braid introduces strands and lets them fall free, so texture matters. For medium to thick hair, pick 5 to 7 points to drop strands across the top of the head. If you try to keep too many drops, the braid can disappear into the hair. A common mistake is over-smoothing the dropped strands. I let those fall with just a touch of lightweight cream to keep them natural. This is a great half-up style for second-day hair because it hides a messy crown.
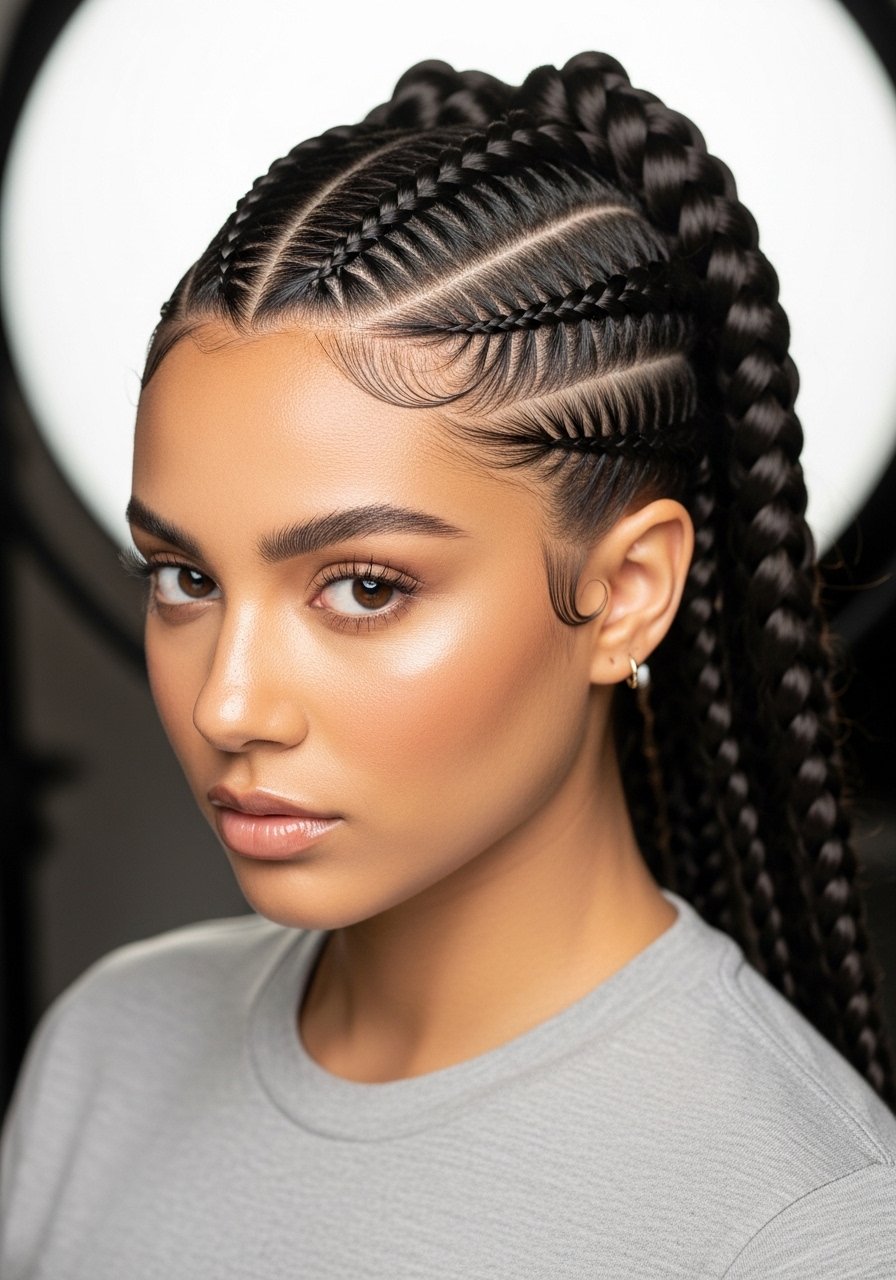
Lace Braid For Natural Hairlines
Lace braids are like French braids but only add hair from one side, so they are perfect for framing without bulk. They are fantastic on coily textures to smooth edges gently. Use small 1/4-inch sections near the hairline and keep tension consistent to avoid uneven pulling. If you want a softer look, pancake the braid slightly once secured. For protection style longevity, moisturize the scalp with a light oil every seven to ten days and avoid heavy creams that attract lint.
Bubble Braid For Playful Long-Lasting Style
Bubble braids are fast and look intentional with minimal skill. Tie small elastics every 3 to 4 inches down the length and gently tug each segment to form the bubbles. On thicker hair, space the elastics closer together for more segments. A mistake is using colored elastics that break the visual flow. Use clear elastics and finish with a light mist of anti-frizz spray. This takes five minutes and survives sleep well if you wrap the hair in a silk scarf.
Boho Side Braid With Texturizing Threads

Add ribbon, thin leather, or threads for a festival-ready boho braid. For fine to medium hair, a single narrow ribbon woven through the braid gives dimension without weight. Use texturizing powder at the roots and mist the length with a salt spray, then braid loosely and pull sections for that undone look. If your hair is freshly washed and slippery, a light pre-style mousse will help. This is one of the friendlier styles for second-day hair.
Micro Braid Accents For Curly And Coily Hair
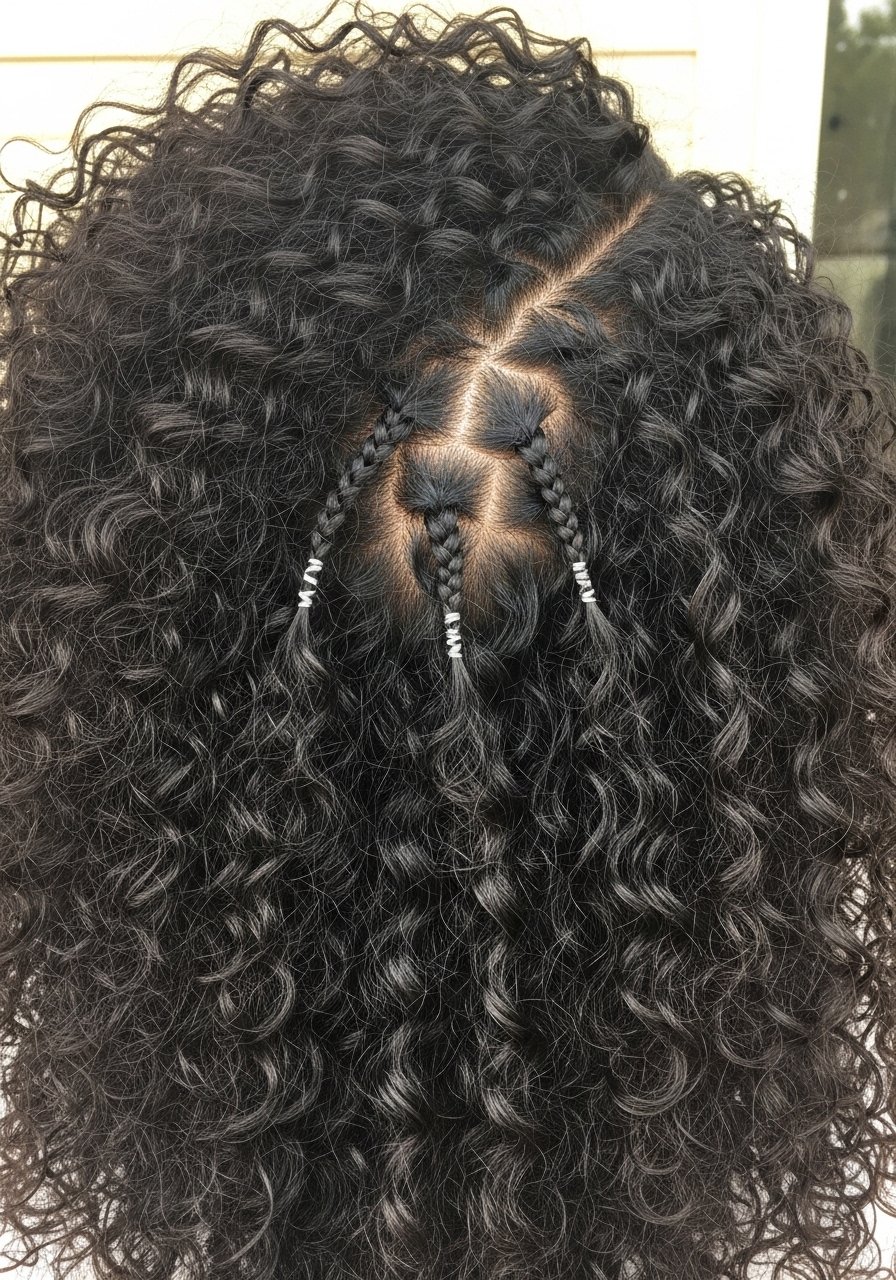
Tiny accent braids are a low-commitment way to freshen a look. I braid 2 to 4 small sections at the hairline and leave the rest loose. They protect the fragile front pieces without full-head tension. For coily textures, keep the braids slightly looser than usual to avoid breakage. Re-braid every 2 to 4 weeks depending on how fast your hair grows. If you use oils, apply sparingly on these braids so they do not slip out.
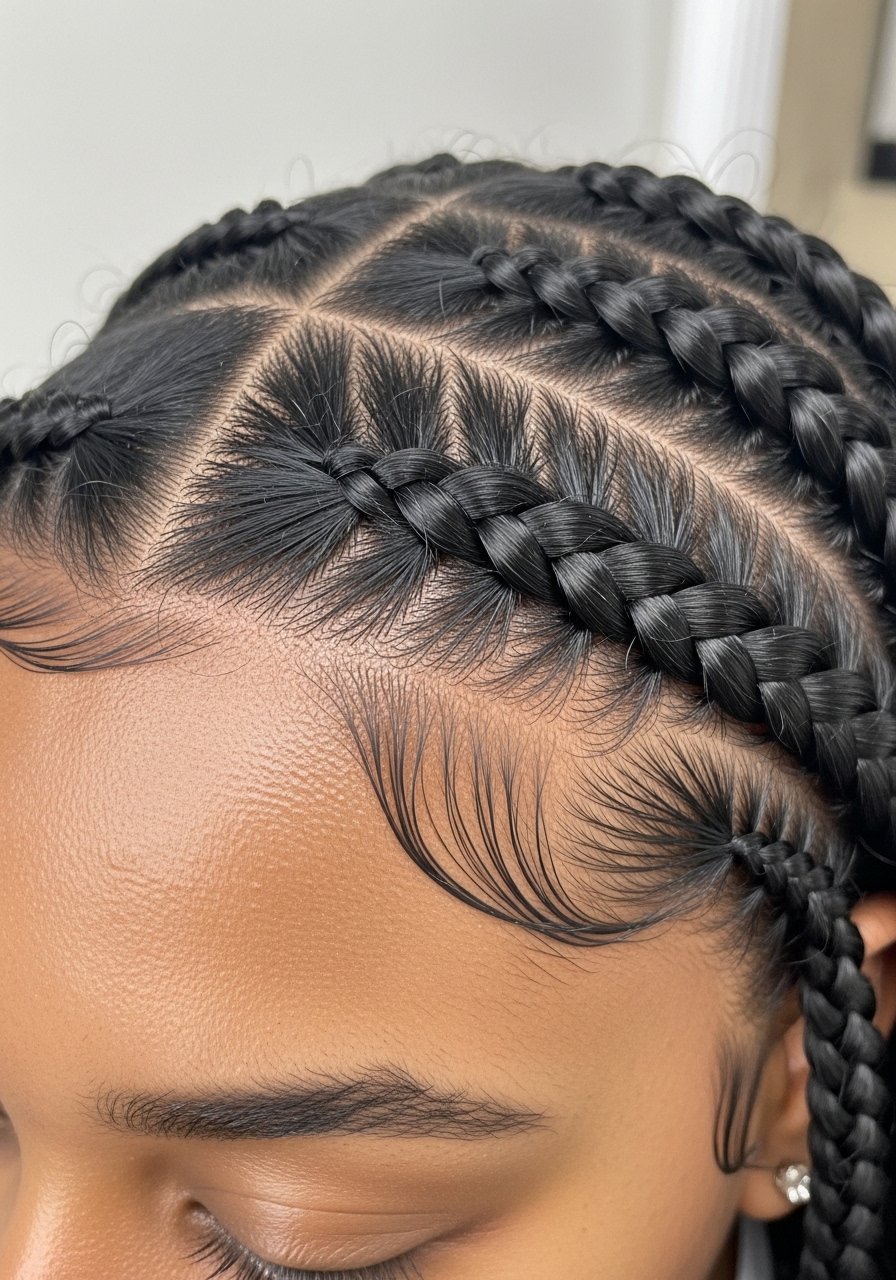
Goddess Braids For Long-Term Protective Styling
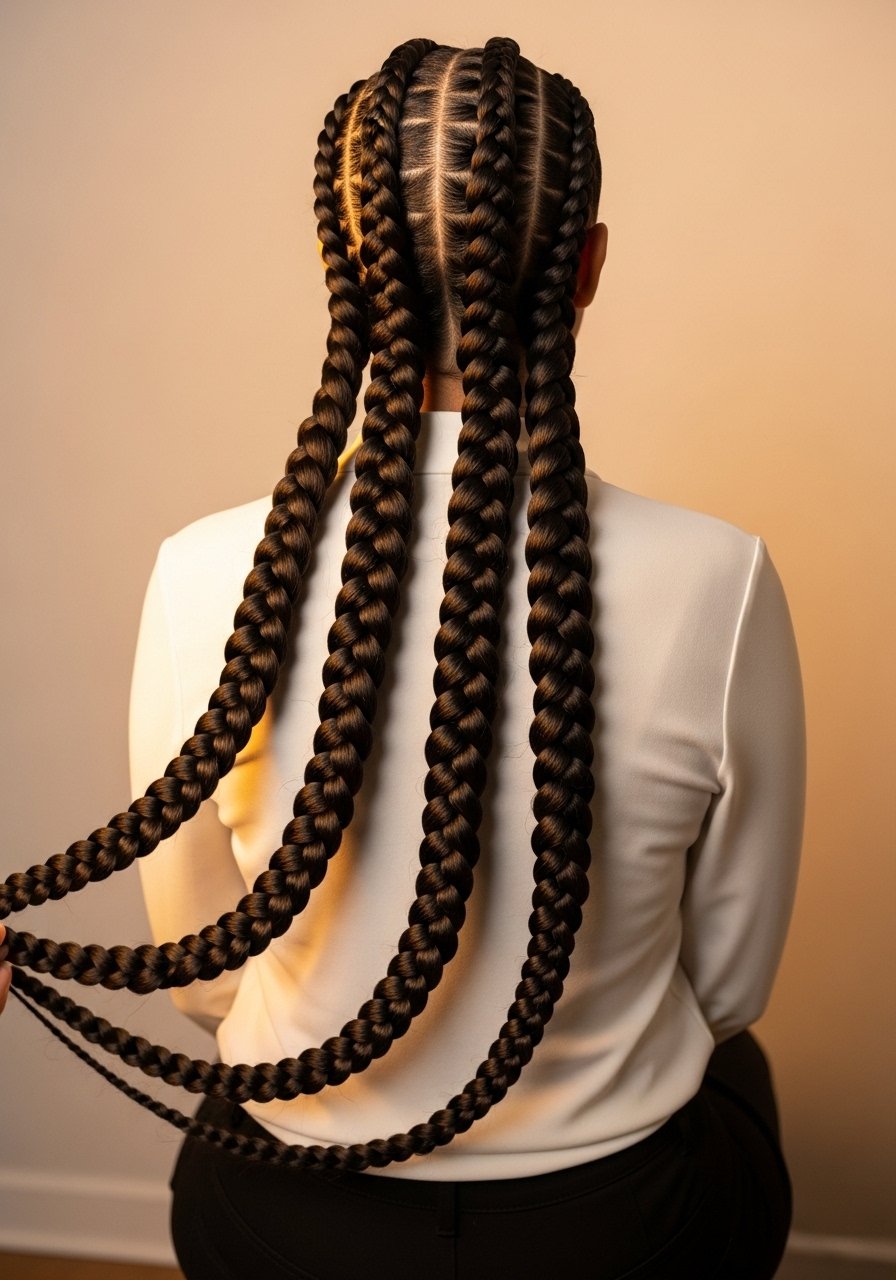
Goddess braids are larger, raised cornrows that last and protect when done with care. For maximum longevity, keep the first inch from the scalp firm and the rest relaxed. If you plan to keep them for a month or more, schedule a light maintenance at week two to tighten any loose parts. Use a scalp oil for dryness, but avoid over-oiling which can loosen synthetic additions. This is a salon option if you want speed and symmetry, but a patient DIYer can achieve them with a mirror and a friend.
What I Wish I Knew Before I Tried All These Braids
- Heat protectant goes on damp hair, not dry. Most heat protectants you spray on dry hair before flat ironing barely work. They need to absorb into damp or just-dried hair to actually shield the cuticle. Color Wow heat protectant is lightweight and absorbs quickly.
- You do not need to over-tighten. Tight feels secure at first and then creates breakage over weeks. Looser roots with secure ends last longer.
- Hair grows about half an inch a month at most, regardless of what biotin gummies promise you. Trimming and reducing breakage helps length look healthier more than any supplement. Grab a silk pillowcase and a weekly bond treatment like Olaplex No. 3 to keep ends intact.
- For slippery freshly-washed hair, rough-dry to 80 percent before braiding. Grip matters more than strength of product.
- Protect your edges by alternating styles. Heavy braids every week will wear them down.
Frequently Asked Questions
Q: Can I wash my hair with box braids in?
A: Yes, but be gentle. Dilute a sulfate-free shampoo in an applicator bottle and focus on the scalp, rinsing thoroughly. Pat dry and apply a light oil to the scalp. Avoid soaking the length unnecessarily which lengthens drying time and can cause mildew under tight installations.
Q: How often should I re-do my micro braids or accent braids?
A: For micro braids at the hairline, plan every two to four weeks. If your hairline is fragile, do shorter intervals. Take them out before you see significant thinning or constant tension in those spots.
Q: Will braids cause hair loss?
A: Repeated tight tension over time can cause traction alopecia. If you notice thinning, stop tight styles, give your scalp rest, and see a dermatologist or trichologist for persistent concerns. Switch to looser parts and protective styles that do not pull on the same hairline every week.
Q: Can I use Olaplex No. 3 on non-damaged hair?
A: Yes, it will not harm healthy hair. It simply adds some strengthening and slip. Buy Olaplex from the official store on Amazon or at Sephora to avoid counterfeits. Use it once a week if you are maintaining rather than repairing.
Q: How do I keep a fishtail braid from falling apart during the day?
A: Small consistent sections and a pre-styling grip product are key. Add texture with a dry shampoo or a pea-size of leave-in before braiding and finish with a light flexible spray. Tucking the end under and pinning it can prevent slippage.
Q: Is it worth getting goddess braids done professionally?
A: If you want perfect symmetry and speed, yes. A pro will also choose the right tension to protect the scalp. DIY is doable but expect longer install time and less uniformity.
Q: How often should I oil my scalp when wearing protective braids?
A: Every seven to ten days is a good rhythm. Use a light non-comedogenic oil and apply sparingly to avoid product build-up which can cause itching and require more frequent washing.